Thursday, December 30, 2010

Pear-Cranberry Pie with Almond Meal Crust


The year 2010 has come to just one more day.  It has been a good year to me, it's full of surprises, mostly good thankfully.  It has also been a busy year, with work, traveling to Indonesia, and parents moving across the state.  I like to stay busy and the goals for this year have made me work harder and creatively.  At times I grew frustrated but once the goals were done, I felt good with my accomplishments.
Pear-Cranberry Pie with Almond Meal Crust

Pear-Cranberry Pie with Almond Meal Crust

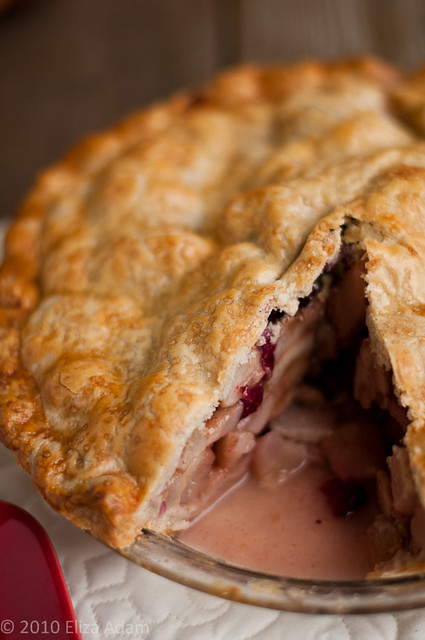
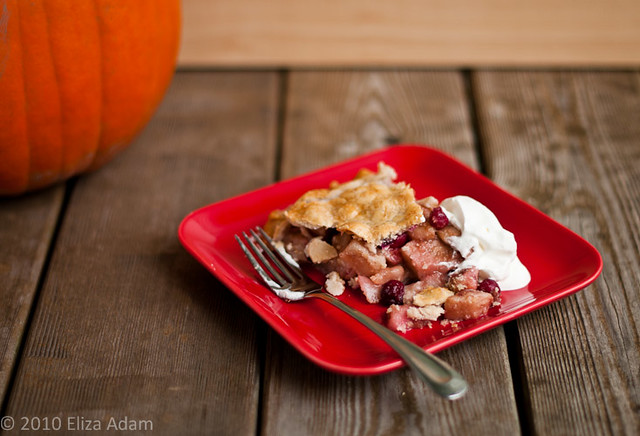
I don't have regrets leaving this year, I'm actually ready for the new year.  Call me an optimist, or someone with a sunny disposition; I'm facing the unknown with a brave face.  And to leave this year in good spirit, I'm posting one more sweet note to you all.  I made a pear-cranberry pie with almond meal crust earlier this month as a way to experiment with pie crust.  I usually make an all-butter crust or half-butter, half-shortening crust for my pie; but I wanted to try an almond meal pie crust from Bob's Red Mill website.  The filling recipe was adapted from a various sources--which honestly spelled "I forgot where I got the recipe".  It's basically an approximation of  about 5-6 pears with a cup or so of fresh cranberries.  Thrown those together with sugar, cinnamon, lemon juice, and some cornstarch, if you like.  I got a tasty pie and easy enough to make in under several hours.

I bade farewell to 2010, happy New Year to my readers, hope to see you soon!

Pear-Cranberry Pie with Almond Meal Crust

Makes one 9-inch double-crust pie

Almond Meal Crust

1/2 cup almond meal flour

1 1 2/ cups unbleached all-purpose flour

1 teaspoon salt

2/3 cup vegetable shortening, cut into small pieces, chilled

2 tablespoons unsalted butter, cut into small pieces, chilled

5-6 tablespoons ice water

Combine both flours and salt in the food processor, pulse to mix.  Scatter vegetable shortening and butter over the dry ingredients and pulse several times until the mixture resembles coarse crumbs.  Drizzle half of the water over the flour mixture, pulse several times.  If the mixture seems dry, add some more water and pulse until it seems cohesive enough to form a ball.

Using your hands, divide the pastry into one large ball and one smaller ball.  Flatten each into a disk, wrap in plastic wrap and refrigerate until dough is chilled enough to roll (at least 30 minutes).

Pear-cranberry filling

5-6 large ripe pears, peeled, cored, and coarsely chopped

1 cup fresh cranberries, picked over for stems

3/4 cup sugar

1 tablespoon fresh lemon juice

1/2 teaspoon ground cinnamon

1 1/2 tablespoons cornstarch

Glaze

1 egg, beaten with 1 tablespoon milk

Turbinado, Demerara, or granulated sugar for sprinkling

Preheat the oven to 350 degree F.

Combine pears, cranberries, and the rest of the ingredients in a large bowl; toss to combine.

On a floured surface, roll the larger piece of pastry to about 12-inch circle; sprinkling it lightly with flour as needed so doesn't stick.  Carefully fold in half and transfer to a 9-inch pie pan.

Pour the filling over the bottom crust.  Trim away excess dough, leaving about 1-inch overhang.  Roll out the smaller piece of pastry and drape over filling.  Trim edges and pinch to seal.  Make several slits on top crust for the steam to escape.  Brush the top with egg wash and sprinkle some sugar on top.

Set the pie on a baking sheet to catch the drips.  Bake in the bottom rack for 50-60 minutes or until the crust is golden brown.  Cover the top crust with foil if it browns too quickly.  Let cool before slicing.

Thursday, December 23, 2010

Iced-Lemon Ginger Cookies


Iced-lemon ginger cookies collage

Christmas is only two days away.  With it comes a joy in my life; I've accomplished my biggest undertaking of the year, helping my parents move to Oregon.  The plan to move was dreamed up years ago but the time has never been right for my parents.  Until at last they decided that this year was the year to move.  Perhaps because of my mom's years of  unwell leg stemmed from having bad back, or it was my dad's sudden twice hospitalization within a year that motivate them to move closer to their only daughter.  I'm doing my finial duty, a very traditional way of honoring my parents, by agreeing to take care of them, and in return, they'll take care of my family too.

I'm so glad to be back home again after a 3-day driving trip from California to Oregon.  The trip was right on schedule, the weather was nice enough for me to drive though California was deluged with rain storm when we left the old house.  These few weeks will be hectic for all of us here, my parents especially since they have to go through many boxes before they could truly settle down.
Iced-lemon ginger cookies

I think I might not be able to post anything new for a while but before I go I want to share a recipe that I tried for a cookie exchange.  This recipe was from FOODday early in December and it's adapted from Alice Medrich's new book, Chewy Crispy Crunchy Melt-In-Your-Mouth Cookies.  The minute I read the recipe I knew this is a cookie with big and bold flavor given Ms Medrich's reputation, and I wanted to eat this spicy and flavorful cookie.  So I tried, I ate, and I rejoiced because it's what I expected.  I added the lemon icing which was a perfect combination with the ginger.  Perhaps you should try it too, you won't be disappointed!

Merry Christmas to all of you, I hope you have a blessed one with your loved ones.

Iced-Lemon Ginger Cookies

Makes about 50 cookies

2 cups unbleached all-purpose flour

2 teaspoons baking soda

2 teaspoons ground ginger

1 1/2 teaspoons ground cinnamon

1/2 teaspoon ground allspice

1/4 teaspoon salt

1/2 cup unsalted butter, melted and still warm (1 stick)

1/4 cup dark molasses (mild or robust)

1/2 cup granulated sugar

1/3 cup packed brown sugar

2 tablespoons peeled and finely minced or grated fresh ginger

1 egg

2/3 cup diced (1/4-inch) crystallized ginger

About 3/4 cup Demerara or turbinado sugar or 1/4 cup granulated sugar, for rolling

Preheat the oven to 350 degrees F.  Position racks in the upper and lower thirds of the oven.  In a medium bowl, combine the flour, baking soda, ground ginger, cinnamon, allspice, and salt and mix thoroughly with a whisk.

In a large bowl, combine the warm butter, molasses, granulated sugar, brown sugar, fresh ginger, and egg and mix thoroughly.  Add the flour mixture and crystallized ginger and stir until incorporated.  The dough will be soft.

Form the dough into 1-inch balls.  (Refrigerate unrolled dough between batches.)  Roll the balls in the Demerara or turbinado sugar and place them 2 inches apart on lined or ungreased cookie sheets.  Bake for 10 to 12 minutes, or until the cookies puff up and crack on the surface and then began to deflate in the oven.  Rotate the sheets from top to bottom and from back to front halfway through the baking time to ensure even baking.  For chewier cookies, remove them from the oven when at least half or more of the cookies have begun to deflate; for crunchier edges with chewy centers, bake for a minute or so longer.

For lined pans, set the pans or just the liners on racks to cool; for unlined pans, use a metal spatula to transfer the cookies to racks.  Cool the cookies completely before storing.  May be kept in an airtight container for several days.

Lemon icing

Enough to ice about 50 cookies

2 cups confectioners' sugar

2 tablespoons unsalted butter, at room temperature

About 4 tablespoons lemon juice

Combine all ingredients in a bowl, beat with a wooden spoon until the mixture is smooth.  Drizzle the icing on cool cookies.

Sunday, December 12, 2010

Marbled Green Tea Yogurt Cake


Just a quick post from what I've tried a few weeks ago.  I saw this recipe in Fine Cooking, but instead of regular yogurt cake I added green tea powder and marbled the appearance.  I didn't make a new ganache since I had some leftover.  Overall, it was an okay cake, the texture was not as I expected; it was a bit dense.  It sure looks pretty on photos though.
greenteayogurtcake-1


greenteayogurtcake-1-2


The recipe can be found here.  To get the marbled green tea appearance, divide 1/3 of the batter and add the green tea powder into it.  Pour the white batter into pan, drop the green tea batter into it, and swirl the batter with a butter knife.  This cake is best eaten after it is baked.

Wednesday, December 1, 2010

Apple Cider Donuts


Can you stand another post about apple cider? :)

Hanukkah (Chanukah) is a Jewish holiday that starts from December 1 till December 9 this year.  It is an eight-day Jewish holiday which commemorates the rededication of the Holy Temple in Jerusalem; it is also called the Festival of Light.  Even though I'm not a Jewish but I'm fascinated by the relationship of each of its holiday with foods.  The tradition of eating deep-fried foods is observed, Ashknenazi Jews are making latkes and Shepardic Jews are making donuts or fritters.
appleciderdonuts-1-4

appleciderdonuts-1-13

I think I might fit well in the Shepardic families since I love eating deep-fried foods, and this time of year I finally had a chance to try the apple cider donuts.  The recipe can be found here, and I followed it thoroughly, no change this time.  The texture of the donuts were good, with fine crumbs and tender, they're delightful to eat.  The only thing I was disappointed was that my donut cutter was a bit too big.  As a result the donuts were a bit flatter and very, very big.  Stick with a smaller cutter and you'll be having a good time making this!  Next year I'm baking sufganiyot :)

Wednesday, November 24, 2010

Pecan Oatmeal Waffles


It is the night before the Thanksgiving day, and I am sure everyone can't wait until tomorrow.  Tomorrow is the day to eat turkey, gravy, stuffing, Brussels sprouts, cranberry sauce, and pies, lots of pies.  I don't cook turkey for Thanksgiving feast since my husband refuse to eat the bird in no matter what shape it is prepared.  We don't miss it that much and I, invariably, cook non-traditional Thanksgiving dinner.  Some year it will be Chinese food, other year, Indonesian food.  This year, I'm cooking milk fish soup; it's called pindang bandeng.  The soup is simple yet delicious, eaten with steamed rice, padi crackers, and chili paste; it's a feast for us.

But, this post actually is not about the soup; rather it is about what you might want to make for breakfast the morning after Thanksgiving.  Originally the recipe didn't call for pecan, but pecan sounded wonderful in waffles, did it?  It added crunch and delightful aroma to otherwise already crisp and spice infused waffles.  The blackberry curd that accompanied the waffles was an added touch that I thought was perfect.  I had a surplus of blackberries from last summer and I made about 2 cups of curds that I stored in the freezer.   I think any different curd will work out as well.  I used my raspberry curd that was posted in my old food blog, click here for the recipe.  Instead of raspberry, I use blackberry with that recipe.
pecanoatmealwaffles-1-9

Pecan oatmeal waffles

The way to serve these waffles is easy.  After the waffles are cooked, slather some blackberry curd in the middle.  Place them in a plate and drizzle maple syrup on top.  I'm sure this is a breakfast for the champion!  Happy Thanksgiving everyone!

Pecan Oatmeal Waffles

Makes 8 servings

3 1/3 cups all-purpose flour

1 1/2 cups rolled oats

1/2 cup granulated sugar

2 tablespoons plus 2 teaspoons baking powder

1 teaspoon baking soda

1 teaspoons salt

2 teaspoons pumpkin pie spice

7 large eggs

4 cups buttermilk

1/3 cup butter, melted

1/3 cup toasted pecans, coarsely chopped

Combine the first seven ingredients in a large bowl.  Make a well in the middle of the mixture.

Combine eggs with the buttermilk and mix well; pour this into the dry mixture.  Stir until it's almost combined, pour in the melted butter and then mix just until the butter is worked in.  Refrigerate the mixture for 12 hours.

Preheat the waffle iron.  Stir in chopped pecans to the batter.  Pour about 3/4 cup of batter into the waffle iron and cook until they are golden, crisp, and cooked through.  Serve with blackberry curd and maple syrup.

Source: adapted from Breakfast & Brunches by The Culinary Institute of America

Saturday, November 20, 2010

Hot Caramel Apple Cider

Hot Caramel Apple Cider

Winter weather coming your way?  Do not be afraid.  Arm yourself with apple cider, caramel, and whipped cream; you are ready to battle the nasty weather.


Hot caramel apple cider

This drink is one of the simplest hot drinks to make this season.  What you want from the apple cider is to get one that is fresh, just pressed, and from a mix variety of apples.  The next time you drive through an orchard, do not leave without a gallon of fresh apple cider.  Keep one in the fridge for a at home luxurious indulgence.  Besides making hot apple cider, the cider can be used for making donuts, candy caramels, and everything else tasty.  But that is another story...

Hot Caramel Apple Cider

Serve 4-6

24 ounces fresh apple cider

1 cinnamon stick

4 tablespoons caramel syrup

1 cup heavy cream

1 tablespoon sugar

Caramel sauce for drizzling

Heat apple cider in medium saucepan until quite hot but not boiling.  Add the caramel syrup.  Whip heavy cream with the sugar until stiff peak.  Ladle the cider into some mugs, top with sweetened whipped cream, drizzle some caramel sauce.  Enjoy!

Wednesday, November 17, 2010

Ang Chow Chicken Soup with Preserved Mustard Greens


Do you have a hand-me down recipe that you frequently make now?  Several years ago I asked my mom if she would write down her recipes for me.  I wanted her to write down recipes that she is used to cook while I was growing up, and recipes that she also continues to make at present time.  She obliged, and in about 6 months presented me with a notebook containing her hand-written recipes.  I have also written down her recipes once I started cooking, so her notebook supplements what I have.

One of the recipes in her notebook is this Ang Chow Chicken.  Ang chow is red rice wine from Foochow (or Fuzhou), the capital city of Fujian province in China.  To make ang chow, ang kak, or red yeast rice, is used along with jui piah, or wine cake, glutinous rice, and water.  Glutinous rice is cooked first, which then will be put together in a container with the rest of the ingredients.  Jui piah, or wine cake, is rubbed loose to get the content blended with rice and ang kak.  The process of fermentation will take about 30 days.

I did not know how one would make ang chow before until I searched the Internet and came upon this wonderful article regarding the making of ang chow.  It is fascinating!  I hardly see or know where ang chow is sold here in the Oregon, and whenever I get to go back to Indonesia, I make sure I bring a bottle of ang chow with me.  I cherish that bottle and would only use a little bit at a time even though I love the taste of ang chow in a cooked dish.  I don't know how my family came to cook this particular dish; I'm not sure if one of my ancestors came from Fujian province either.  I'd better asked my father the next time I talk to him.

There are two version of cooking with ang chow in soup in my family, one is with chicken and preserved mustard greens/pickled mustard greens, the other one is with beef and daikon radish.  Ang chow is believed to have health benefits in cooking, for lowering cholesterol, and for mothers who just have given births.  I may not care too much about the health benefits because this dish is certainly a comfort food for me, especially during the cold season.

Ang Chow Chicken Soup with Preserved Mustard Greens

2-3 lbs bone-in chicken thighs (or breasts)

1 10.5 oz preserved mustard greens/pickled mustard greens

3 garlic cloves, sliced

3-4 thick slices of ginger

1-2 tablespoons ang chow

Salt and white pepper to taste

Rinse chicken, chop into smaller size.  Parboil the chicken for a few minutes and drain.  Drain the mustard, and immerse it in a bowl of cool water for 10 minutes.  Drain again, and chop leaves to about 1-inch long.

In a large pot, heat 1 tablespoon of cooking oil, saute garlic and ginger slices for 30 seconds.  Add the ang chow and stir for another 30 seconds.  Add chicken parts, mustard leaves, and water (about 5-6 cups).  Let it boil, then simmer the soup for 15-20 minutes or until the chicken is tender and cooked through.  Taste with salt and pepper.

Saturday, November 13, 2010

Pumpkin Chiffon Cake


I fell in love the first time I saw it.  Maybe you are sick of pumpkin by now, but it is only the second week of November, and Thanksgiving is only two weeks away.  I am just trying to make it relevant :)  So, I made pumpkin chiffon cake.  I did not realize that I actually like light and airy cake like chiffon better than any other cake.  The light texture was fooling me by thinking that since it is weighed next to nothing I could eat a few slices at one time.
Pumpkin Chiffon Cake collage

The flavor of the pumpkin was subtle, the way I like it and it did not need any more adornment other than a sprinkling of confectioners' sugar.  It was quite the best of chiffon cake I have ever tasted.  The cake in the pictures looked deflated in the middle because I had to take the pictures the day after, but do not be discouraged, the taste was still terrific.

Head over to this site, where you will find the recipe.

Books to love and to have


Chronicle Books has a contest for you and me, and it is called Happy Haul-idays.  It is a contest for everyone who loves books and find happiness in reading books :)

Even though this blog isn't particularly about books, but I love baking and cooking books and I have several Chronicle books in my library already.  Each one of Chronicles books is gorgeous in both the design and photo aesthetic. By entering this contest I have a chance to win $500 worth of books of my choice; and for you readers, if you like my book list and leave comments on my post, you'll be automatically be entered in the contest and have a chance to win my list.  There's one catch, you have to be a US resident to enter this giveaway.  This contest ends on 11:59 pm EST, December 14, 2010.

So why not make the list and enter it?  Here is mine:
Flour: Spectacular Recipes from Boston's Flour Bakery + Cafe


Farmers' Market Desserts: Gorgeous Fruit Recipes from First Prize Peach Pie to Chocolate Cherry Cupcakes

Whoopie Pies: Dozens of Mix 'em, Match 'em, Eat 'em Up Recipes!

Chocolate Cakes: 50 Great Cakes for Every Occasion

Baking for All Occasions: A Treasury of Recipes for Every Celebration

Tartine

The Chocolate Deck: 50 Luscious Indulgences

Ice Cream Treats: Easy Ways to Transform Your Favorite Ice Cream into Spectacular Desserts

Cake Stencils: Recipes and How-To Decorating Ideas for Cakes and Cupcakes

Bon Appétit Celebrations Deck: 50 Recipes for Special Parties and Happy Holidays All Year Long

Fast, Fresh & Green: More Than 90 Delicious Recipes for Veggie Lovers

Rice Pasta Couscous: The Heart of the Mediterranean Kitchen

Sunday Soup: A Year's Worth of Mouthwatering, Easy-to-Make Recipes

The Big Book of Soups and Stews: 262 Recipes for Serious Comfort Food

Saveur The New Comfort Food: Home Cooking From Around the World

Where Flavor Was Born: Recipes and Culinary Travels Along the Indian Ocean Spice Route

Martin Yan's China

Quick & Easy Korean Cooking: More than 70 Everyday Recipes

Lobel's Meat Bible: All You Need to Know about Meat and Poultry from America's Master Butchers

Puff: 50 Flaky, Crunchy, Delicious Appetizers, Entrees, and Desserts Made with Puff Pastry

This last one book is not about baking or cooking, but it's something that, if I win, I will give to my husband as a gift for Christmas.  He loves Beatles, and for all his patience for being my food taster, he deserves a great book like this.

The Beatles Anthology

My total comes to $499.30, not bad, huh? :)  Now, I'm crossing my fingers and hope for the best!

Tuesday, November 9, 2010

Avocado Chocolate Bits Frozen Yogurt


The first time I saw the recipe, it was on Fine Cooking website, and so it being avocado I've got to try it.  In the US, avocado are used mainly in savory dishes, but you would find around the world that the fruit is often used in sweet dishes.  Philippine, Indonesia, Brazil, and Vietnam share the love of pureed avocado shakes sweetened with sugar and/or sweetened condensed milk, with chocolate syrup sometimes added in Indonesia.

My family loves to drink avocado shakes, sometimes a shot of coffee is added to the drink, along with a pinch of salt to round up the taste.  I wanted to marry the flavor of avocado and chocolate in this frozen yogurt, and what better way than to add chopped bittersweet chocolate in it?
Avocado Chocolate Bits Frozen Yogurt

The original recipe asked for lime zest along with the juice to give a tang to the frozen yogurt, but I don't want to do that.  I want my frozen yogurt creamy and sweet.  I then only added half tablespoon of lemon juice to keep the avocado from being discolored.  The top it off, just before serving I drizzle some sweetened condensed milk; now you might think it's a no-no, but not until you try all of those together then you may say, ah, I get it.  Pale green with flecks of chocolate, this frozen yogurt is sure pretty.
avocadochocolatebits-1-11


Avocado Chocolate Bits Frozen Yogurt


Makes about 1 quart


2 cups whole milk

3/4 cup sugar

1/2 teaspoon vanilla extract

4 large egg yolks

1 cup plain whole-milk yogurt

2 medium, firm-ripe avocados (6 to 7 oz. each), peeled, pitted

1/2 tablespoon lemon juice

1/3 cup chopped bittersweet chocolate (60-70% cacao)

Sweetened condensed milk for drizzling, optional


Heat milk and sugar over medium heat in a medium saucepan until just comes to a boil, stirring occasionally.  Stir in the vanilla.

Have ready a large bowl filled with ice and set a small metal bowl over the ice with a strainer set over it.

Place egg yolks in a medium bowl, lightly beaten.  Ladle some of the milk into the egg yolk, whisk it to prevent curdling.  Pour this mixture back into the rest of the milk in the saucepan.  Cook over low-medium heat until mixture is thick and can cover the back of a wooden spoon, about 4 to 8 minutes.

Pour the mixture over the strainer into the small bowl; stir in the yogurt.  Whisk the mixture over the ice bath until it cools completely.

Scoop the avocado meat and puree in a blender or food processor along with the lemon juice and some of the cooled custard.  Pour this mixture back to the rest of the custard, blend them together until it is thick and creamy.

Freeze the custard in an ice cream maker according to the manufacturer's instructions.  Halfway through the freezing process, fold in the chopped bittersweet chocolate.  Transfer the frozen yogurt into a freezer-safe container and freeze until solid, at least 4 hours.

Saturday, November 6, 2010

Toffee Peanuts--Bake sale #4


Planters brand sells Sweet N' Crunch peanuts, I made toffee peanuts :)  The taste is pretty similar as well, oh, I was so excited I could make these.  Making them wasn't hard but it was time consuming, especially when it was time to stir so the the peanuts so the sugar coated them evenly.

The recipe could be made with any other nuts or a combination of nuts.
Toffee peanuts


Toffee Peanuts


Makes about 2 pounds


1 1/2 cups sugar

1/4 cup butter

4 cups shelled raw peanuts (with skins)

3/4 teaspoon salt

1/4 teaspoon ground cinnamon


Lightly greased a large rimmed baking sheet; set aside.

Stir together sugar, butter, and 1/2 cup water in a large deep pot over medium heat; cook, stirring constantly, 3 minutes or until better melts and sugar dissolves.

Increase heat to medium-high; add peanuts, and cook, stirring often, 15 minutes, or until mixture becomes dry.  Reduce heat to medium, and continue to cook 6 to 9 minutes, stirring often, until sugar melts and turns golden.  It will coat the nuts, but do not stir constantly.  Sprinkle with salt and cinnamon; stir well.  Spread nuts in a single layer on prepared baking sheet.  cool completely; break nuts apart.  Store in an airtight container up to 2  weeks.


Source:  adapted from Christmas with Southern Living 2009

Tuesday, November 2, 2010

The Foodista Best of Food Blogs Cookbook Prizes Giveaway


I'm trying to finish up this post before the end of the day.  One last important thing before tomorrow rolls in.

Do you remember that my recipe was chosen to be part of The Foodista Best of Food Blogs Cookbook?  Tomorrow, Foodista will give prizes giveaway for the release of the book.  It is open to anyone who buys the book between 10 a.m. to 11 a.m. P.D.T. through Amazon.  For the complete detail CLICK HERE.

This truly has been a joyous moment for me to have my recipe published in a book, and I am sure the rest of 99 people whose recipes got chosen are joyous too :)

Dried Cherry-Almond Scones--Bake sale #3


The third item in my bake sale tray: dried cherry-almond scones.  Traditional scones are plain, eaten with jams and clotted cream.  Modernized scones are colorful, with dried fruits, chocolate chunks, fresh fruits, and nuts.  There is nothing wrong of wanting to eat the original flavor, and at other times, the modernized version.

The important thing is to keep the texture of the scones light and tender, flaky and buttery; it should be crumbly in your mouth.  This scones is small in size but big in flavor, I actually like the recipe that it uses buttermilk instead of milk or cream, it makes the dough light inside with crusty exterior.  Almost like biscuits, ooh...I love biscuits :)

Dried cherry-almond scones

Dried Cherry-Almond Scones


Makes 16 small rectangular scones


2 1/4 cups all-purpose flour

1/2 cup sugar, divide

1 tablespoon baking powder

1/2 teaspoon baking soda

1/2 teaspoon salt

6 tablespoons unsalted butter, cut into pieces

1 cup dried cherries

1/2 cup chopped toasted almonds

2/3 cup buttermik

2 large eggs

1/2 teaspoon almond extract

Parchment paper


Preheat oven to 400 degree F.  Stir together flour, 1/4 cup sugar, and next 3 ingredients in a large bowl; cut int butter with a pastry blender or fork until crumbly.  Stir in cherries and almonds.

Whisk together buttermilk, 1 egg, and almond extract; add to flour mixture, stirring with a fork just until dry ingredients are moistened and mixture forms a shaggy dough.

Use floured hands to pat dough into a 1/2-inch thick, 10-x7-inch rectangle on a lightly floured surface; cut into 16 rectangles.  Place scone dough on a parchment paper-lined baking sheet.  Whisk together remaining egg and 1 teaspoon water.  Brush scones with egg wash; sprinkle with remaining 1/4 cup sugar.

Bake in preheated oven for 12 to 15 minutes or until golden.


Source:  adapted from 2009 Christmas with Southern Living

Wednesday, October 27, 2010

Nutella Brownies--Bake sale #2


Who doesn't like brownies?  There are people who like them fudgy, then there are who like them cakey.  I like my brownies kind of in between, because when it gets too fudgy it has become a fudge instead of a brownie :)

Who doesn't like Nutella?  Though it's not the healthiest food on earth, it has become a favorite in the US recently.  I've eaten Nutella since I was young so nothing could take away my habit of eating it.  Slather it on toasted bread or bagel, it's a perfect after work snack for me.

This brownies recipe combine the best of the two flavors together.  Add chopped hazelnuts in it, you may find it more irresistible to eat just one bar.  Good luck keeping it intact in whole!
Nutella brownies collage


Nutella Brownies


Makes 16 brownies


3/4 cup all-purpose flour

1/2 teaspoon baking powder

1/4 teaspoon salt

3/4 cups hazelnuts

1/2 cup unsalted butter

2 ounces unsweetened chocolate, finely chopped

1/4 cup Nutella

2/3 cup sugar

2 large eggs, lightly beaten

1 teaspoon vanilla extract

1/2 tablespoon hazelnut liqueur (Frangelico), optional


Preheat oven to 350 degree F.  Line an 8-inch square pan with foil, leave extra foil overhanging on two sides of pan, grease the foil and set aside.  Combine the flour, baking powder, and salt in a small bowl.

Toast hazelnuts in the oven until fragrant, about 10 minutes.  Immediately dump them in a clean kitchen, let cool for 10 to 15 minutes.  Rub hazelnuts vigorously with towels to remove skins.  Some skins will still stick to the nuts, which is fine.  Roughly chop, and set aside.

Fill the bottom of a double boiler with 1 inch of water and bring to a simmer over medium heat.  Combine the butter, chocolate, and Nutella in the top double boiler.  Whisk the mixture occasionally until it's completely melted.  Set aside to cool slightly.

Whisk together the sugar and egg in a large bowl.  Using a wooden spoon, stir in the chocolate mixture and the vanilla, then stir in the flour mixture until just incorporated.  Stir in the chopped hazelnuts.

Pour the batter into the prepared pan.  Bake for 30 to 35 minutes, or until just set.  Cool completely in the pan on  a wire rack.  Lift brownies out by the foil and cut into 16 squares.


Source:  adapted from The Only Bake Sale Cookbook You'll Ever Need by Laurie Goldrich Wolf and Pam Abrams

Sunday, October 24, 2010

Macadamia Nut Brittle-Bake sale #1


Around this time of the year my son's school has a fall festival where there are produce, baked goods sold, games and activities for the family to participate, a cook-off; basically a day to try to enjoy fall day :)  The day actually started very rainy since the night before.  It was rainy on and off with some sunshine peeked through.  This year the activities and booths are located inside the gym which means braving the cold becomes easier.

I usually bake some goodies to be sold in the baked goods booth, and this year I restrained myself and made only five items.  Out of five, I only had to bake two, so the load wasn't so heavy.  Plus, this year I worked by myself instead of having another mom helping me.  All the goods are kid-friendly and I hope everyone would love them.

In this post, the first of the five series, I'm posting macadamia nut brittle recipe.  I love eating brittles, especially when they are crunchy and buttery.  Last year I made peanut brittles, this time macadamia nut takes a stand.  The recipe is from a book by Charity Ferreira:  Brittles, Barks, and Bonbons; a small book filled with good candy recipes.  Not too complicated yet the flavor of each recipe really shines through.  My favorite candy book so far!
Macadamia nut brittle--item 1


Macadamia Nut Brittle


Makes 2 pounds brittle


6 tablespoons (3/4 stick) unsalted butter, cut into chunks, plus more for pan

1/2 teaspoon baking soda

1 tablespoon vanilla extract

2 1/2 cups sugar

1/2 cup water

1/3 cup light corn syrup

1/4 teaspoon salt

2 cups macadamia nuts (about 12 ounces), lightly toasted and roughly chopped


Lightly butter a 10-by-15-inch jelly pan.  Dissolve the baking soda in the vanilla extract; set aside.

In a large pot over medium-low heat, stir together the sugar, water, 6 tablespoons butter, the corn syrup, and salt until the sugar is dissolved and the butter is melted.  Increase the heat and cook, stir occasionally with a heatproof spatula or wooden spoon, until the mixture turns a deep golden brown and measures about 335 degree F on a candy thermometer, 10 to 15 minutes.  Remove from heat and carefully (the mixture will bubble up) stir in the vanilla mixture and nuts.

Immediately pour into the prepared pan.  If necessary, use a spatula or wooden spoon to spread the mixture flat.  Let stand at room temperature until cool and hard, about 1 hour.

Bend the ends of the pan to release the brittle and chop or break into chunks.  Store in an airtight container in the refrigerator for up to 2 weeks.

Friday, October 22, 2010

Lemon-Coconut Bread

lemoncoconutbread-1-3

Quick bread is nothing sort of spectacular for a dessert but even if it posits to be humble, the effect is most often sweet and delectable.  Give way to lemon-coconut bread, made a few days ago because I wanted to escape the ho-hum of everyday chores.  I was in a good mood and had lots of energy because I accomplished not just one bread but two types of breads; one was my favorite bread of the week, three-seed whole wheat.

lemoncoconutbread-1-10

That bread was almost gone, only a slice or two left in the bread box, but I still  have the lemon-coconut bread.  It has stayed moist for two days and was meant to be savored piece by piece with a warm drink.  Perfect for a storm that's brewing in the horizon.
lemoncoconutbread-1-13


Lemon-Coconut Bread


Makes one 9x5-inch loaf


2 1/4 cups all-purpose flour

3/4 cup granulated sugar

1 tablespoon baking powder

1/4 teaspoon salt

1 tablespoon lemon zest

3/4 cup sweetened coconut

2 tablespoons vegetable oil

2 eggs

3/4 cup milk

1/4 cup lemon juice

For lemon icing:

1 1/2 cups confectioners' sugar

2-3 tablespoons lemon juice


Preheat oven to 350 degree F.  Grease one 9x5-inch loaf.

Stir together flour, sugar, baking powder, salt, and lemon zest in a large bowl.  Stir in coconut.

Beat oil, eggs, and milk with an electric mixer in a separate bowl until frothy.  Stir in lemon juice.  Pour mixture over dry ingredients and stir until just combined.  Spoon into prepared pan.

Bake in preheated oven for 70-80 minutes or until a cake tester inserted in the center comes out clean.

Make the icing:  Stir confectioners' sugar with 2 tablespoons lemon juice in a bowl with a wooden spatula.  Add more lemon juice if it's too stiff.

When the cake is done, let it cool in pan over rack for 10 minutes.  Remove pan and let it cool completely on rack before icing it.


Source:  adapted from 125 Best Quick Bread Recipes by Donna Washburn and Heather Butt

Tuesday, October 19, 2010

My kinda chopped salad


I used to garden, a long while  back when there were only two of us in the house.  I had much time in my hand, and I didn't know that cooking, baking, and taking food photography would take up my time back then.  So, I channeled my energy and focus on gardening.  Though I didn't have a fancy landscaping, my husband and I would go to garden centers at times and picked some flowers or ornamental plants to be added in the yard.  I didn't garden extensively, only during spring and summer time I would be busy in the yard; but I would grow something and get harvest from it and my husband and I got to enjoy eating them too.

Now that much of my time is writing and making food--plus I also worked part-time during the day--my garden was neglected.  Pretty much left were some herb plants and strawberry plants in the garden boxes.  No more going out to garden centers and buying plants.  It's a little sad, but as long as my yard is clean and doesn't grow too wild, I'm already happy about the situation.  But, never despair, somebody would give us his/her share of his/her crops to us and we still get to enjoy fresh harvested produce.
fresh beets

fresh beets in tray

Take these beautiful beets for example.  A friend of ours has a big yard in his property and he gardens extensively, so he asked me one day if I like beets.  I said, sure I love them but I'm the only one who's eating them in the household.  He promised to share a couple of his fresh plucked-from-the-earth beets with me.  He came a while back and brought two good-size beets.  I decided to make a simple chopped salad using roasted beets because beets this fresh really don't need a fussy preparation.
choppedbeetspinachsalad-1

choppedbeetspinachsalad-1-4

The ingredients can be changed as you like, play with other food's texture and flavor, or what's available in your fridge and pantry.  That's what I did anyway, these were what I happened to have at home and I sure made use of them effectively.  The vinaigrette used roasted walnut oil, if this is too strong of a taste for you, substitute with other mild oil.

Chopped Beet Salad


Serves 4


1 medium-size fresh beet, leaves trimmed

2 hard boiled eggs, diced

10 oz. spinach, stems trimmed, leaves sliced thinly

1 medium Gala apple, diced

1/3 cup blue cheese, crumbled

For the walnut oil vinaigrette:

1 1/2 tablespoons sherry vinegar

1 teaspoon Dijon mustard

1/4 teaspoon salt, or to taste

1/8 teaspoon freshly ground black pepper

6 tablespoons walnut oil


Preheat oven to 400 degree F.  Wrap beet tightly with double layers of foil, place in baking sheet and roast in hot oven for about 1 hour, or until it's tender when pierced with a fork.  Cool until warm in foil until ready to use.

Make walnut oil vinaigrette:  Blend together vinegar, mustard, salt, and pepper in a small bowl.  Whisk in the oil in slow stream until it's well blended.

Peel beet skin and diced beets.  Divide and assemble diced beets with other salad ingredients in plates and drizzle dressing over salad and serve.

Saturday, October 16, 2010

Cheesy Potato Corn Scones


The weather has been nice, there's no rain in the forecast for several days, life has been good, why not baking something cheesy?  :)  I'm going back to baking for fun again and I like it so much, thank you.

For a long time I haven't participated in any blogging events,  that I almost forgot that it's supposed to be a fun activity to  do--in my leisure time when I have it.  The annual World  Bread Day is one of them; Zorra, the founder of the event  reminded many of us the food bloggers to participate in this  event this year.  It's the fifth one, and I'm certainly grateful  for her nudge for I haven't been a faithful participant.


Since time is short, just like the fall days ahead, I decided to  bake something quick as well.  It's quick but big in flavor and  it's tender-warm-cheesy-potatoey scones.  Bite into it and  you'll find pockets of cheesy morsels along with the  crunchines of cornmeal and poppy seed.  Scones may not be  hip but it's the food that feeds the soul.


Cheesy Potato Corn Scones


Makes 8 scones


2/3 cup water

2/3 cup instant mashed potato flakes

1/4 cup cold unsalted butter, diced

1 1/4 cups all-purpose flour

1/2 cup yellow cornmeal

1 cup shredded cheddar cheese (4 ounces)

4 teaspoons baking powder

1/2 teaspoon salt

1 teaspoon poppy seeds

1/2 cup milk


Lightly greased a baking sheet; set aside.  In a small saucepan, bring the water just to a simmer; remove from heat.  Stir in potato flakes until moistened.  Stir in butter until it's incorporated to potato flakes.

In a large bowl, combine flour, cornmeal, 3/4 cup of the cheese, baking powder, salt, and poppy seeds; stir in potato mixture and milk.  With floured hand, gently knead and fold the dough for five to six strokes, or until the dough comes together in one mass.  Pat the dough lightly to flatten it into a 9-inch circle on prepared baking sheet.  Cut dough into eight wedges using a pizza cutter or floured knife (do not separate).  Sprinkle edges with remaining cheese.

Bake in a preheated 400 degree F oven for about 25 minutes or until lightly browned.  Gently pull or cut scones to separate.  Serve warm.


Source:  adapted from Better Homes and Gardens Holiday Baking 2009

Friday, October 15, 2010

Chinese Style Stewed Meatballs


Spaghetti and meatballs are comfort food, Italian style.  Stewed meatballs and rice  are comfort food, Chinese style.  Either one is very welcome in my family and I decided to make one this week.

It's a pretty straightforward dish, pair it with one or two other stir-fried dish to serve for a family meal.

Chinese Style Stewed Meatballs


Serves 4


400 g ground beef

80 g ground pork

3 tablespoons cold water

1/2 cup canola oil

600 g Napa cabbage

1 cup beef stock

1 tablespoon sliced green onion

Seasoning for the meatballs:

1 teaspoon finely chopped ginger

1 egg

1/4 teaspoon baking soda

1/2 tablespoon soy sauce

1/4 teaspoon salt

1/2 tablespoon Shaoxing wine

1 tablespoon cornstarch

Seasonings for the sauce:

1 tablespoon soy sauce

1/4 teaspoon salt

1/2 teaspoon sugar

2 teaspoons cornstarch + 1 tablespoon water

1/2 teaspoon sesame oil


Grind ground beef and pork in a food processor with cold water for about 1 minute until the mixture comes together smoothly.  Add the seasonings for the meatballs to the mixture, and using your fingers blend them into the mixture until it comes together.

Slice the Napa cabbage into large pieces.  Stir fry with 2 tablespoons oil and season with 1/3 teaspoon salt.  Cover and cook until the cabbage is soft but still has bite to it.  Remove to a platter and keep warm.

Heat the remaining oil in a large skillet over medium heat.  Wet hands with water and form ball from about 2 to 3 tablespoons of meat mixture.  Drop the meatballs to the hot pan and press slightly on top of each meatballs.  Cook each side approximate 3-4 minutes, or until they are golden brown.  Drain off the oil from the skillet.

Pour 1 cup of beef stock to the skillet, add soy sauce, salt, and sugar.  Let it boil then simmer fro 2 minutes.  Adjust the seasoning if needed at this time.  Thicken the sauce with the mixture of cornstarch and water, stir continuously until the sauce thicken.  Splash sesame oil and sprinkle chopped green onions on top.  Place meatballs over Napa cabbage on the platter.

Tuesday, October 12, 2010

Shrimp Ball Soup with Chai Sim


There's so many things I've done this month that it's hard to find time to write anything here. Everything was to be done in a hurry, I was looking at the month through numbers. Certain number means certain things to be done. I'm hoping by the end of this week I could catch my breath and start doing things more leisurely.

Today also marks my son turning nine years old; there's always a joy of remembering how he came to the world after so many years waiting for that moment to come. Following his mom devotion to food, he asked me to bring donuts for his friends today. I was happily obliged, knowing that his friends would be more than happy to gobble up goodies.

Don't you think donuts is one of comfort foods of all time? I'm now getting into the mood of cooking for cooler weather. Soups, braised dishes, generally anything that spells comfort is on my menu for the next few weeks. I'm trying to use what's available in season, which is a sensible and budget-friendly approach. When cooking Asian-style dishes, I try to also use what kind of v egetables available in the Asian market. Some vegetables, like long beans are scarce during fall and winter seasons. One vegetables that stays constant is choy sum or chai sim or chai xin. It's a type of Chinese cabbage that's mild in flavor and is very good in soup.

Both the flavor of the soup and the texture of the shrimp balls are delicate. Don't be alarmed that the soup will be colored light green from the vegetables.

Shrimp Ball Soup with Chai Sim


Serve 4


400 gr small to medium shrimps with shells
100 gr chai sim
Salt

For the shrimp ball mixture:
1 teaspoon Chinese cooking wine
1/2 teaspoon salt
1 tablespoons egg white
2 tablespoons cornstarch


Rinse shrimps several times, peel off the shells, and devein them. Put the shells in a large stockpot and fill with about 6 cups of water. Bring to boil and simmer for 20 minutes. If you don't want to use shrimp stock, you can use chicken stock of the same amount.

Rinse chai sim and chop roughly to 2-inches long.

Mince the shrimp meat and mix with cooking wine, salt, egg white, and cornstarch. Shape the shrimp mixture into small balls. Put them in a lightly greased dish and steam over high heat for about 5 minutes.

Bring the soup stock to a boil. Add chai sim and salt. Pour soup into a large soup bowl and add shrimp balls to it. Serve immediately.

Friday, September 17, 2010

Ground Cherry Flognarde


In the midst of everyday life and assignments, I'm hungry for something sweet and quick.  My snack supply from Indonesia has reached the level of near-bottom, and I'm actually quite sad to see those goodies are gone.  If only they could magically reappear in the box, I'll be happier.

Yesterday I brought home a bag-full of ground cherry.  The first time I saw the fruits, I thought of it as tomatillos, but after researching through the Internet, this was ground cherry or from the family of Physalis.  The fruit has husk like tomatillo and the flavor is similar to tomato with a hint of pineapple.  The plant is also a relative of tomato plant.  Nobody knew what to do with them at work, so I volunteered to bring home some and intended to make use of it.


Okay, so I knew all of those info, but what would I do with the fruits?  I finally chose clafoutis as the means and almonds for the texture and added flavor.  I took a liking to Simply Recipe's Cherry Clafoutis but I decreased the amount of the sugar used because 1 cup was simply too sweet for my taste.  Half cup of whipping cream replaced half of the milk used to make the dish creamier.  I divided the batter to two 8-inch round cake pan because I wanted to share it with my co-workers.  I wanted them so taste the fruits from a different perspective.  So yeah, the flognarde looked a little thin in the photos.  And wording aside, flognarde is a egg-custard dessert using similar technique and ingredients as clafoutis but using different fruits other than cherries.  So even though I'm using ground cherry, it's technically not real cherry ;)

The result?  It ranks high in the pleasure palate, leaving behind a luxurious taste of creamy custard along with fruity explosion of ground cherries in the mouth.


Ground Cherry Flognarde


Serves 6


2 cups fresh ground cherry, husks removed

2 tablespoons slivered almonds

3 eggs

1/2 cup sugar

1 tablespoon brown sugar

1/2 cup all-purpose flour, sifted

1/8 teaspoon salt

1/2 cup whole milk

1/2 cup whipping cream

3/4 teaspoon of almond extract

1 1/2 teaspoons of vanilla extract

Powdered sugar for dusting, if desired


Preheat the oven to 350F. Butter and lightly flour one 9x9-inch or two 8-inch round baking dish. Scatter the ground cherries and slivered almonds in the dish.

Whisk the eggs, sugars, salt, and flour together until smooth.

Add the milk, whipping cream, almond extract, and vanilla extract. Whisk until smooth. Pour into the baking dish.

Bake for 40-50 minutes or until lightly browned and a toothpick inserted into the center comes out clean. The finished batter will jiggle slightly when it's pull out of the oven which is normal. Place on a wire rack to cool. The flognarde will have puffed up quite a bit and will deflate while cooling. When cool dust the flognarde with powdered sugar if desired.


Source:  adapted from Simply Recipe's Cherry Clafoutis

Monday, September 6, 2010

Spinach Böreks


For a long time I'm curious of how böreks taste like because I have never eaten one before.  I imagine it to be crispy on the outside and creamy and tangy from feta cheese.  Layer upon layer of crispy phyllo enveloping lightly sauteed spinach and feta cheese.  This doesn't mean I know how to make correct böreks shape, but this one that I made was delicious.  I've always loved Mediterranean flavor and I thought this goes well with an improvised and quick chickpea salad.  A while ago I tasted chickpea salad from Food Front in Hillsdale that I thought was fantastic.  They put all the things that I love in salad in one unity.  I could eat salad like that forever :)

The dressing for the chickpea salad is nothing other than balsamic vinegar/red wine vinegar, lemon juice, a bit of minced garlic, extra-virgin olive oil,  and salt and pepper.  Add chickpeas, feta cheese, chopped red onion, spinach, chopped tomatoes, chopped parsley, and chopped artichoke hearts.  Blend everything together and that's it.  There's countless recipes to make salad like this and you can add or omit ingredients as you like.


This particular böreks recipe is taken from Anissa Helou's book, Savory Baking from the Mediterranean.  A book that's filled with various recipes from countries in the region, from pizza, flatbreads, breads, pies, tarts, and pastries.  Though it lacks color photos, I trust Anissa Helou as she's the experts on the Mediterranean and Middle East cuisines.

Lastly, this meal is fit to be in Meatless Monday movement that's going on right now. I've done countless "meatless" days throughout the week for a long time already, so it's not something that's hard to participate.

Spinach Böreks (Ispanakli Tepsi Böregi)


Serves 4


For the filling:

1 pound fresh spinach

1 tablespoon exra-virgin olive oil

1 tablespoon unsalted butter

2 medium onions, finely chopped (about 1 cup)

2 medium eggs

1/4 cup crumbled feta cheese

Fine kosher salt or sea salt

Freshly ground black pepper

Other ingredients:

1/3 cup unsalted butter, melted, plus extra for greasing the pie plate

1 1/2 tablespoons whole milk

1 medium egg

12 sheets phyllo pastry, thawed if frozen


Make the filling: Wash and drain the spinach and put it in a large stockpot over medium-high heat.  Cook for 3 to 5 minutes, stirring frequently, until just wilted.  Drain and cool.  Then squeeze the spinach by hand until it is very dry.  Separate the leaves and set aside.

Put the olive oil, butter, and onions in a large saute pan over medium-high heat.  Cook, stirring occasionally, until the onions are lightly golden.  Add the spinach and cook for another minute or two.  Remove the heat and stir  in the 2 eggs and the feta.  Season with salt and pepper to taste, return to the heat, and cook for about 2 minutes, stirring constantly, until the eggs are very softly scrambled.  Set the filling aside.

Preheat the oven to 400 degrees F.  Mix the melted butter with the milk and 1 egg in a small bowl.  Grease a 9-inch round and 1-inch deep pie plate with a little melted butter.

Place 1 sheet of phyllo across the pie plate, leaving half the sheet hanging over the edge.  Keep the remaining sheets of phyllo covered with plastic wrap or kitchen towel.  Brush the portion of the first sheet that is in the pie plate with milk mixture and fold the overhanging half over it; if any part of the sheet still hangs over the edge, either leave it there or trim it.  Brush again with the milk mixture.  Repeat the process with 4 more sheets of phyllo.

Spread the filling over the pastry.  Cover with the remaining phyllo sheets, brushing each layer with milk mixture and folding the overhangs over.  Pour any remaining milk mixture over the top and cut the pie, all the way to the bottom, into 4 squares.

Bake for 25 to 35 minutes, until golden all over.  Serve hot or warm.


Source: Savory Baking from the Mediterranean by Anissa Helou

Thursday, September 2, 2010

Two great news


Today is unbelievably exciting.  Two great news in a day is certainly a good reason to celebrate, though I haven't a slightest idea where and how I will celebrate :)  The above photo of fig and mascarpone represents how "calm" my heart right now.


The first news is quite predictable.  The fall issue of Zupan's magazine, Indulge, is out in Zupan's stores and online today.  What surprised me was that they put my pear-ginger charlotte on the cover of the magazine.  As soon as I woke up, I went online, and logged on Zupan's website.  I gasped once I saw the photo; hmm...my editor didn't tell me beforehand :)  But I am relieved that the photo looks great as the cover and looking inside the magazine, I'm very pleased of the contents.  Really solid editorial theme and photos throughout the issue.   Please visit Indulge online or go to Zupan's store for the hard copy, you'll find inspiring fall season recipes.


The second news is a shocker.  Truly, I didn't expect this to come into my inbox in the afternoon.  I think my heart skipped a beat when I read the email :)  Foodista chose my Green Tea-Chocolate Steamed Cupcakes to be in their The Foodista Best of Food Blogs Cookbook!  Though honestly, before the email reached me, I kept checking Foodista's website, trying to found out if they've announced the 100 winners yet.  Call me vain, but I'm so happy beyond belief, giddy like a 16-year old getting her new driver's license.   I'm thankful to Sheri Wetherell who's been patient with me and by emailing me back and forth in regards to the instructions.  The book will be out in October 19, 2010 and it can be pre-order through Amazon by clicking here.  Now, I can't wait till October 19, it's still a month and a half away!