Sunday, February 28, 2010

Americana Banana Roll


Banana is one fruit that's consistent in our household.  I enjoy eating banana that's not too ripe, so is my son.  The only person who's willing to eat ripe banana is my husband :)  Needless to say, there's always too many ripe bananas before we are able to finish them all.  So here is what I did with banana a few weeks ago.

One thing for sure is that I'm looking for an unusual method to incorporate banana in a cake.  I found it by trying a recipe from a book called The Simple Art of Perfect Baking by Flo Braker.  I was skeptical at first, banana in a roll cake?  Would it be possible?  But hey, there's nothing to lose, only one large banana to use!

The first step is to make a banana sheet cake which would be rolled later after it's filled with a combination of whipped cream and sour cream.  The sheet cake is sweet, not overly so, and when it's paired with the filling, it came out as a delightful roll cake.  Sour cream in a sweetened whipped cream is meant to give a little tang to the creaminess of the whipping cream.  It's a first for me to incorporate those two in one, something that I was grateful to learn.

I could hardly believe that the cake is so perfectly moist and very easy to make.  In less than 2 hours the cake was done and ready to be devoured.  This cake could take so many variations on the filling that I'm planning to make one again soon, as soon as one the bananas in the fruit basket is brown and ripe :)

Americana Banana Roll


Makes 8 to 10 servings


Banana Sheet Cake

Makes one 12 x 15 1/2-inch cake


1 cup sifted cake flour

1/2 teaspoon baking soda

1/8 baking powder

1/8 teaspoon salt

1 large egg, room temperature

1/2 cup ( 1 large) mashed ripe banana

1 tablespoon sour cream

1 teaspoon lemon zest

5 1/2 tablespoons unsalted butter, room temperature

1/2 cup granulated sugar

Position rack in lower third of oven; preheat oven to 375 degree F.

Lightly grease a 12 x 15 1/2 x 1/2-inch baking sheet and line pan with foil, leaving a 2-inch overhang at each short end.  Grease and flour the foil, tapping excess flour. Pour flour, baking soda, baking powder, and salt into a sifter.  Sift onto a sheet of waxed paper ; set aside.

Crack egg into a small bowl, and whisk briefly.  Combine the mashed banana, sour cream, and lemon zest in a small bowl; set aside.

Place butter in the bowl of a heavy-duty mixer.  With a paddle beater, cream the butter on medium speed for 30 to 45 seconds, or until it is smooth and light.  Add sugar steadily, scrape the bowl as needed.  Continue to cream until mixture is light in color and fluffy in appearance.  Pour in the egg and continue to cream for about 1 to 2 minutes. Add half of the flour, stir with a rubber spatula.  Add the mashed banana mixture, stirring to blend.  Add the remaining flour mixture and stir until smooth.

Scoop the batter onto five different areas over two-thirds of the prepared baking sheet.  With a spatula, spread and coax the batter to cover the two-thirds of the sheet.  Extend it to the rest of the sheet in as even a layer as possible.  Bake for 8 to 10 minutes, or until the cake is light brown, the sides are beginning to contract from the metal, and the cake springs back when lightly touched in the center. Remove the pan from the oven.  Using a knife, release any portion of the cake sticking to the long sides of the pan.  Pull up on the foil overhangs, one at a time, to release foil from the pan's edges.  Lift up the cake bottom gently and transfer it to a large rack to cool.   Place a sheet of foil over the cake in a tent fashion, and let it cool for 30 minutes.

To make the roll cake:

One recipe Banana Sheet Cake

1 tablespoon granulated sugar

For the filling:

3/4 cup heavy cream

2 tablespoons sour cream

1 tablespoon granulated sugar

1 teaspoon vanilla

3 tablespoons unsifted powdered sugar

Slip a baking sheet of the same size under the foil-lined banana sheet cake.  Sprinkle 1 tablespoon granulated sugar over the cake's surface.  Place two 18-inch strips of foil lengthwise on top of the sugared cake, one overlapping the other; then place a second baking sheet of the same size on top of the foil.  Invert the cake on it, and carefully peel the baking foil from the cake.

Combine the filling ingredients in the bowl of a mixer, with a wire beater whip until soft peak.

Lift the cake on the two overlapping sheets of foil off the baking sheet so that one of its long sides is parallel to the edge of your counter.  Spread the cream evenly over the cake, up to 1 inch on the long end.  Begin rolling by flipping the edge of cake nearest you over onto itself.  Then, with the aid of the foil, roll the cake lengthwise until you reach the end.

Sprinkle a light coating of powdered sugar over the cake before serving.


Source:  adapted from The Simple Art of Perfect Baking by Flo Braker

Poppy Seed Cupcakes


Continuing my post about lemon curd on my old food blog, I have one more to share with you here.  This idea of making cupcakes filled with lemon curd occupied my mind while I was working.  I was trying to figure out what kind of cake I wanted to make and how could I incorporate the curd in the cake.  Something small would be better since I didn't want to make something elaborate.  My thought went to Chockylit who made a variety of cupcakes with different kinds of fillings on the inside of the cupcakes.  So bingo!

I also browsed my baking books and found a recipe of poppy seed layer cake with lemon curd-whipped cream as the filling in Martha Stewart's Christmas Cookbook.  Since I love flavored whipped cream, I thought that's it, I was off to make these cupcakes right away.

For these cupcakes, I filled them half with lemon curd-whipped cream and the other half with just lemon curd.  Preferably, the lemon curd needs to be thicker to stay in the cupcake, and usually cornstarch is  added when making it but since I only had that curd, I just had to use it.  It only became visible that when it's cut into two, the curd started to flow and wouldn't stay put for the photograph!  I had fun doing this project and the combination of poppy seed and lemon curd were sweet!


Poppy Seed Cupcakes


Makes about 22 cupcakes


1 cup (2 sticks) unsalted butter, room temperature

2 1/2 cups sifted all-purpose flour

1 tablespoon baking powder

Pinch of salt

1 lemon

1 cup milk

1/3 cup poppy seeds, plus more for sprinkling

1 tablespoon vanilla extract

1 1/4 cup sugar

4 large eggs, room temperature

1 1/2 cups lemon curd, homemade or store-bought

1 cup (1/2 pint) heavy cream


Preheat oven to 350 degree F.  Line cupcake pan with liners.

Sift together flour, baking powder, and salt two times into a bowl; set aside.  Grate zest of lemon into a small saucepan and add milk and poppy seeds.  Heat over high heat until steaming; let cool to room temperature.  Add vanilla extract.

In the bowl of an electric mixer fitted with the paddle attachment, cream butter until soft.  Gradually add sugar; beat on medium speed until very fluffy, about 5 minute, scarping down sides of bowl several times.  Add eggs one at a time, beating well after each addition; continue beating on medium-high speed until smooth, about 1 minute.

Add flour mixture in three additions, alternating with milk mixture and beginning and ending with flour.  Beat on low speed until just combined. Divide batter evenly for the cupcakes, about 2/3 full each.  Bake until tops are golden brown or until a cake tester inserted in center of cakes comes out clean, 20 to 25 minutes, rotating pans once if needed.   Let cupcakes cool completely on wire racks.  Cakes can be made a day ahead before serving if desired.

Cut out a cone from each cupcake and trim the ends of the cones.  Fill the hollowed cupcakes with lemon curd-whipped cream.  Replace each top.  Frost cupcake tops with more lemon curd-whipped cream and sprinkle some poppy seeds.

Source:  adapted from Martha Stewart's Christmas Cookbook

Saturday, February 27, 2010

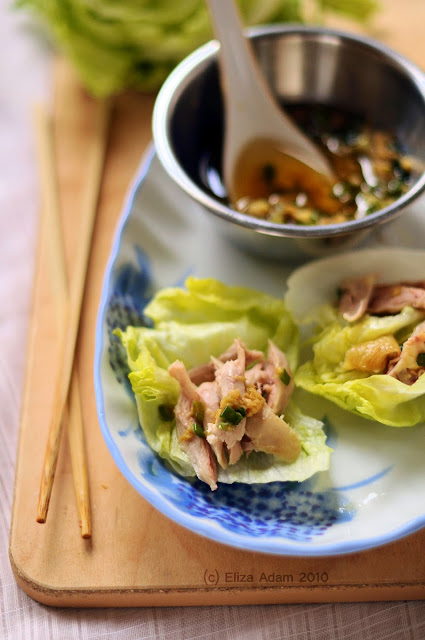
Steamed Chicken Soy-Ginger Sauce


My family loves to have chicken dishes so I have to constantly find recipes that are new and tasty.  One of things I look when preparing a chicken dish is that it also needs to be unfussy, imagine going home from work and I still have to slave for a long hours in the kitchen on weekdays for dinner.  This is one recipe that I found meets both criterias, easy and tasty.  The sauce is really gingery, which I like, but if you feel like it's a bit too much, feel free to lessen the quantity of the ginger.  The chicken is succulent because it is steamed and I love dark meat parts compare to white meat parts, that will be my husband's portion :)


Steamed Chicken with Soy-Ginger Sauce


Serves 4


One 3- to 4-pound chicken, cut in half

1 tablespoon soy sauce


For the sauce:

1/4 cup grated ginger

3 green onions, trimmed and minced

1 tablespoon sesame oil

2 teaspoons soy sauce

1 teaspoon minced garlic

1/2 teaspoon ground ginger

1/4 teaspoon salt

1/8 teaspoon ground white pepper

2 tablespoons vegetable oil

12 iceberg lettuce cups


Arrange the chicken halves skin side up and side by side in a glass pie plate.  Rub the skin with the soy sauce.  Let stand for 15 minutes.

Prepare a steamer and heat over high heat.  Place the pie plate in the steaming basket, cover, and steam over high heat until the chicken is no longer pink near the bone, about 30 minutes.

Meanwhile, make the sauce:  stir the grated ginger, green onions, sesame oil, soy sauce, garlic, ground ginger, salt, and pepper in a small heatproof bowl.  Heat the vegetable oil in a small skillet just until it begins to smoke.  Carefully pour the hot oil into the ginger-soy mixture (the mixture may sizzle).  Stir well and let stand until cool.

Remove the plate of chicken from the steamer and let cool slightly.

Strip the meat from the bones and cut the meat into bite-sized pieces.  Place on a serving platter with the lettuce cups alongside.


Source:  adapted from Martin Yan's Chinatown Cooking

Welcome to my new home!


Hello everyone!  This is so exciting, I have a new home now.  For a couple of years I've been thinking of revamping my old blog, but I discovered that having my food blog on Blogsome is not the best idea to start with.   Blog themes are limited and even if I want to change it, it's almost impossible for a computer illiterate like me to change the codes and layout.  I gave up and the idea of moving somewhere else seemed daunting.  I put this on the back burner and tried to forget it.  Until a few months ago, I had a conversation with Dhita, a newfound friend from another blogosphere, who is a freelance web designer.  She finally convinced me to move my food blog to a real Word Press based theme and hosted by her.  I finally exhaled an approval sigh.

I still can't move all my posts from my old blog, I know it's a bit disheartened to hear.  Though I'm hoping that starting new will rejuvenate my spirit.  So this new blog will start slow while I'm working behind the curtain, tweaking it with Dhita's guidance until it is finally completed.  In the meantime, please enjoy your visit here and don't hesitate to leave comments for me!