Wednesday, October 27, 2010

Nutella Brownies--Bake sale #2


Who doesn't like brownies?  There are people who like them fudgy, then there are who like them cakey.  I like my brownies kind of in between, because when it gets too fudgy it has become a fudge instead of a brownie :)

Who doesn't like Nutella?  Though it's not the healthiest food on earth, it has become a favorite in the US recently.  I've eaten Nutella since I was young so nothing could take away my habit of eating it.  Slather it on toasted bread or bagel, it's a perfect after work snack for me.

This brownies recipe combine the best of the two flavors together.  Add chopped hazelnuts in it, you may find it more irresistible to eat just one bar.  Good luck keeping it intact in whole!
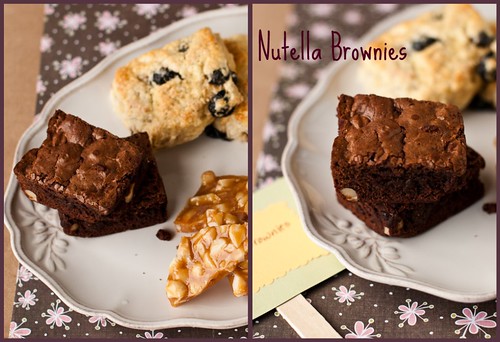
Nutella brownies collage


Nutella Brownies


Makes 16 brownies


3/4 cup all-purpose flour

1/2 teaspoon baking powder

1/4 teaspoon salt

3/4 cups hazelnuts

1/2 cup unsalted butter

2 ounces unsweetened chocolate, finely chopped

1/4 cup Nutella

2/3 cup sugar

2 large eggs, lightly beaten

1 teaspoon vanilla extract

1/2 tablespoon hazelnut liqueur (Frangelico), optional


Preheat oven to 350 degree F.  Line an 8-inch square pan with foil, leave extra foil overhanging on two sides of pan, grease the foil and set aside.  Combine the flour, baking powder, and salt in a small bowl.

Toast hazelnuts in the oven until fragrant, about 10 minutes.  Immediately dump them in a clean kitchen, let cool for 10 to 15 minutes.  Rub hazelnuts vigorously with towels to remove skins.  Some skins will still stick to the nuts, which is fine.  Roughly chop, and set aside.

Fill the bottom of a double boiler with 1 inch of water and bring to a simmer over medium heat.  Combine the butter, chocolate, and Nutella in the top double boiler.  Whisk the mixture occasionally until it's completely melted.  Set aside to cool slightly.

Whisk together the sugar and egg in a large bowl.  Using a wooden spoon, stir in the chocolate mixture and the vanilla, then stir in the flour mixture until just incorporated.  Stir in the chopped hazelnuts.

Pour the batter into the prepared pan.  Bake for 30 to 35 minutes, or until just set.  Cool completely in the pan on  a wire rack.  Lift brownies out by the foil and cut into 16 squares.


Source:  adapted from The Only Bake Sale Cookbook You'll Ever Need by Laurie Goldrich Wolf and Pam Abrams

Sunday, October 24, 2010

Macadamia Nut Brittle-Bake sale #1


Around this time of the year my son's school has a fall festival where there are produce, baked goods sold, games and activities for the family to participate, a cook-off; basically a day to try to enjoy fall day :)  The day actually started very rainy since the night before.  It was rainy on and off with some sunshine peeked through.  This year the activities and booths are located inside the gym which means braving the cold becomes easier.

I usually bake some goodies to be sold in the baked goods booth, and this year I restrained myself and made only five items.  Out of five, I only had to bake two, so the load wasn't so heavy.  Plus, this year I worked by myself instead of having another mom helping me.  All the goods are kid-friendly and I hope everyone would love them.

In this post, the first of the five series, I'm posting macadamia nut brittle recipe.  I love eating brittles, especially when they are crunchy and buttery.  Last year I made peanut brittles, this time macadamia nut takes a stand.  The recipe is from a book by Charity Ferreira:  Brittles, Barks, and Bonbons; a small book filled with good candy recipes.  Not too complicated yet the flavor of each recipe really shines through.  My favorite candy book so far!
Macadamia nut brittle--item 1


Macadamia Nut Brittle


Makes 2 pounds brittle


6 tablespoons (3/4 stick) unsalted butter, cut into chunks, plus more for pan

1/2 teaspoon baking soda

1 tablespoon vanilla extract

2 1/2 cups sugar

1/2 cup water

1/3 cup light corn syrup

1/4 teaspoon salt

2 cups macadamia nuts (about 12 ounces), lightly toasted and roughly chopped


Lightly butter a 10-by-15-inch jelly pan.  Dissolve the baking soda in the vanilla extract; set aside.

In a large pot over medium-low heat, stir together the sugar, water, 6 tablespoons butter, the corn syrup, and salt until the sugar is dissolved and the butter is melted.  Increase the heat and cook, stir occasionally with a heatproof spatula or wooden spoon, until the mixture turns a deep golden brown and measures about 335 degree F on a candy thermometer, 10 to 15 minutes.  Remove from heat and carefully (the mixture will bubble up) stir in the vanilla mixture and nuts.

Immediately pour into the prepared pan.  If necessary, use a spatula or wooden spoon to spread the mixture flat.  Let stand at room temperature until cool and hard, about 1 hour.

Bend the ends of the pan to release the brittle and chop or break into chunks.  Store in an airtight container in the refrigerator for up to 2 weeks.

Friday, October 22, 2010

Lemon-Coconut Bread

lemoncoconutbread-1-3

Quick bread is nothing sort of spectacular for a dessert but even if it posits to be humble, the effect is most often sweet and delectable.  Give way to lemon-coconut bread, made a few days ago because I wanted to escape the ho-hum of everyday chores.  I was in a good mood and had lots of energy because I accomplished not just one bread but two types of breads; one was my favorite bread of the week, three-seed whole wheat.

lemoncoconutbread-1-10

That bread was almost gone, only a slice or two left in the bread box, but I still  have the lemon-coconut bread.  It has stayed moist for two days and was meant to be savored piece by piece with a warm drink.  Perfect for a storm that's brewing in the horizon.
lemoncoconutbread-1-13


Lemon-Coconut Bread


Makes one 9x5-inch loaf


2 1/4 cups all-purpose flour

3/4 cup granulated sugar

1 tablespoon baking powder

1/4 teaspoon salt

1 tablespoon lemon zest

3/4 cup sweetened coconut

2 tablespoons vegetable oil

2 eggs

3/4 cup milk

1/4 cup lemon juice

For lemon icing:

1 1/2 cups confectioners' sugar

2-3 tablespoons lemon juice


Preheat oven to 350 degree F.  Grease one 9x5-inch loaf.

Stir together flour, sugar, baking powder, salt, and lemon zest in a large bowl.  Stir in coconut.

Beat oil, eggs, and milk with an electric mixer in a separate bowl until frothy.  Stir in lemon juice.  Pour mixture over dry ingredients and stir until just combined.  Spoon into prepared pan.

Bake in preheated oven for 70-80 minutes or until a cake tester inserted in the center comes out clean.

Make the icing:  Stir confectioners' sugar with 2 tablespoons lemon juice in a bowl with a wooden spatula.  Add more lemon juice if it's too stiff.

When the cake is done, let it cool in pan over rack for 10 minutes.  Remove pan and let it cool completely on rack before icing it.


Source:  adapted from 125 Best Quick Bread Recipes by Donna Washburn and Heather Butt

Tuesday, October 19, 2010

My kinda chopped salad


I used to garden, a long while  back when there were only two of us in the house.  I had much time in my hand, and I didn't know that cooking, baking, and taking food photography would take up my time back then.  So, I channeled my energy and focus on gardening.  Though I didn't have a fancy landscaping, my husband and I would go to garden centers at times and picked some flowers or ornamental plants to be added in the yard.  I didn't garden extensively, only during spring and summer time I would be busy in the yard; but I would grow something and get harvest from it and my husband and I got to enjoy eating them too.

Now that much of my time is writing and making food--plus I also worked part-time during the day--my garden was neglected.  Pretty much left were some herb plants and strawberry plants in the garden boxes.  No more going out to garden centers and buying plants.  It's a little sad, but as long as my yard is clean and doesn't grow too wild, I'm already happy about the situation.  But, never despair, somebody would give us his/her share of his/her crops to us and we still get to enjoy fresh harvested produce.
fresh beets

fresh beets in tray

Take these beautiful beets for example.  A friend of ours has a big yard in his property and he gardens extensively, so he asked me one day if I like beets.  I said, sure I love them but I'm the only one who's eating them in the household.  He promised to share a couple of his fresh plucked-from-the-earth beets with me.  He came a while back and brought two good-size beets.  I decided to make a simple chopped salad using roasted beets because beets this fresh really don't need a fussy preparation.
choppedbeetspinachsalad-1

choppedbeetspinachsalad-1-4

The ingredients can be changed as you like, play with other food's texture and flavor, or what's available in your fridge and pantry.  That's what I did anyway, these were what I happened to have at home and I sure made use of them effectively.  The vinaigrette used roasted walnut oil, if this is too strong of a taste for you, substitute with other mild oil.

Chopped Beet Salad


Serves 4


1 medium-size fresh beet, leaves trimmed

2 hard boiled eggs, diced

10 oz. spinach, stems trimmed, leaves sliced thinly

1 medium Gala apple, diced

1/3 cup blue cheese, crumbled

For the walnut oil vinaigrette:

1 1/2 tablespoons sherry vinegar

1 teaspoon Dijon mustard

1/4 teaspoon salt, or to taste

1/8 teaspoon freshly ground black pepper

6 tablespoons walnut oil


Preheat oven to 400 degree F.  Wrap beet tightly with double layers of foil, place in baking sheet and roast in hot oven for about 1 hour, or until it's tender when pierced with a fork.  Cool until warm in foil until ready to use.

Make walnut oil vinaigrette:  Blend together vinegar, mustard, salt, and pepper in a small bowl.  Whisk in the oil in slow stream until it's well blended.

Peel beet skin and diced beets.  Divide and assemble diced beets with other salad ingredients in plates and drizzle dressing over salad and serve.

Saturday, October 16, 2010

Cheesy Potato Corn Scones


The weather has been nice, there's no rain in the forecast for several days, life has been good, why not baking something cheesy?  :)  I'm going back to baking for fun again and I like it so much, thank you.

For a long time I haven't participated in any blogging events,  that I almost forgot that it's supposed to be a fun activity to  do--in my leisure time when I have it.  The annual World  Bread Day is one of them; Zorra, the founder of the event  reminded many of us the food bloggers to participate in this  event this year.  It's the fifth one, and I'm certainly grateful  for her nudge for I haven't been a faithful participant.


Since time is short, just like the fall days ahead, I decided to  bake something quick as well.  It's quick but big in flavor and  it's tender-warm-cheesy-potatoey scones.  Bite into it and  you'll find pockets of cheesy morsels along with the  crunchines of cornmeal and poppy seed.  Scones may not be  hip but it's the food that feeds the soul.


Cheesy Potato Corn Scones


Makes 8 scones


2/3 cup water

2/3 cup instant mashed potato flakes

1/4 cup cold unsalted butter, diced

1 1/4 cups all-purpose flour

1/2 cup yellow cornmeal

1 cup shredded cheddar cheese (4 ounces)

4 teaspoons baking powder

1/2 teaspoon salt

1 teaspoon poppy seeds

1/2 cup milk


Lightly greased a baking sheet; set aside.  In a small saucepan, bring the water just to a simmer; remove from heat.  Stir in potato flakes until moistened.  Stir in butter until it's incorporated to potato flakes.

In a large bowl, combine flour, cornmeal, 3/4 cup of the cheese, baking powder, salt, and poppy seeds; stir in potato mixture and milk.  With floured hand, gently knead and fold the dough for five to six strokes, or until the dough comes together in one mass.  Pat the dough lightly to flatten it into a 9-inch circle on prepared baking sheet.  Cut dough into eight wedges using a pizza cutter or floured knife (do not separate).  Sprinkle edges with remaining cheese.

Bake in a preheated 400 degree F oven for about 25 minutes or until lightly browned.  Gently pull or cut scones to separate.  Serve warm.


Source:  adapted from Better Homes and Gardens Holiday Baking 2009

Friday, October 15, 2010

Chinese Style Stewed Meatballs


Spaghetti and meatballs are comfort food, Italian style.  Stewed meatballs and rice  are comfort food, Chinese style.  Either one is very welcome in my family and I decided to make one this week.

It's a pretty straightforward dish, pair it with one or two other stir-fried dish to serve for a family meal.

Chinese Style Stewed Meatballs


Serves 4


400 g ground beef

80 g ground pork

3 tablespoons cold water

1/2 cup canola oil

600 g Napa cabbage

1 cup beef stock

1 tablespoon sliced green onion

Seasoning for the meatballs:

1 teaspoon finely chopped ginger

1 egg

1/4 teaspoon baking soda

1/2 tablespoon soy sauce

1/4 teaspoon salt

1/2 tablespoon Shaoxing wine

1 tablespoon cornstarch

Seasonings for the sauce:

1 tablespoon soy sauce

1/4 teaspoon salt

1/2 teaspoon sugar

2 teaspoons cornstarch + 1 tablespoon water

1/2 teaspoon sesame oil


Grind ground beef and pork in a food processor with cold water for about 1 minute until the mixture comes together smoothly.  Add the seasonings for the meatballs to the mixture, and using your fingers blend them into the mixture until it comes together.

Slice the Napa cabbage into large pieces.  Stir fry with 2 tablespoons oil and season with 1/3 teaspoon salt.  Cover and cook until the cabbage is soft but still has bite to it.  Remove to a platter and keep warm.

Heat the remaining oil in a large skillet over medium heat.  Wet hands with water and form ball from about 2 to 3 tablespoons of meat mixture.  Drop the meatballs to the hot pan and press slightly on top of each meatballs.  Cook each side approximate 3-4 minutes, or until they are golden brown.  Drain off the oil from the skillet.

Pour 1 cup of beef stock to the skillet, add soy sauce, salt, and sugar.  Let it boil then simmer fro 2 minutes.  Adjust the seasoning if needed at this time.  Thicken the sauce with the mixture of cornstarch and water, stir continuously until the sauce thicken.  Splash sesame oil and sprinkle chopped green onions on top.  Place meatballs over Napa cabbage on the platter.

Tuesday, October 12, 2010

Shrimp Ball Soup with Chai Sim


There's so many things I've done this month that it's hard to find time to write anything here. Everything was to be done in a hurry, I was looking at the month through numbers. Certain number means certain things to be done. I'm hoping by the end of this week I could catch my breath and start doing things more leisurely.

Today also marks my son turning nine years old; there's always a joy of remembering how he came to the world after so many years waiting for that moment to come. Following his mom devotion to food, he asked me to bring donuts for his friends today. I was happily obliged, knowing that his friends would be more than happy to gobble up goodies.

Don't you think donuts is one of comfort foods of all time? I'm now getting into the mood of cooking for cooler weather. Soups, braised dishes, generally anything that spells comfort is on my menu for the next few weeks. I'm trying to use what's available in season, which is a sensible and budget-friendly approach. When cooking Asian-style dishes, I try to also use what kind of v egetables available in the Asian market. Some vegetables, like long beans are scarce during fall and winter seasons. One vegetables that stays constant is choy sum or chai sim or chai xin. It's a type of Chinese cabbage that's mild in flavor and is very good in soup.

Both the flavor of the soup and the texture of the shrimp balls are delicate. Don't be alarmed that the soup will be colored light green from the vegetables.

Shrimp Ball Soup with Chai Sim


Serve 4


400 gr small to medium shrimps with shells
100 gr chai sim
Salt

For the shrimp ball mixture:
1 teaspoon Chinese cooking wine
1/2 teaspoon salt
1 tablespoons egg white
2 tablespoons cornstarch


Rinse shrimps several times, peel off the shells, and devein them. Put the shells in a large stockpot and fill with about 6 cups of water. Bring to boil and simmer for 20 minutes. If you don't want to use shrimp stock, you can use chicken stock of the same amount.

Rinse chai sim and chop roughly to 2-inches long.

Mince the shrimp meat and mix with cooking wine, salt, egg white, and cornstarch. Shape the shrimp mixture into small balls. Put them in a lightly greased dish and steam over high heat for about 5 minutes.

Bring the soup stock to a boil. Add chai sim and salt. Pour soup into a large soup bowl and add shrimp balls to it. Serve immediately.