Sunday, June 17, 2012

Strawberry-Banana Crepe Cake

Strawberry season is officially here!

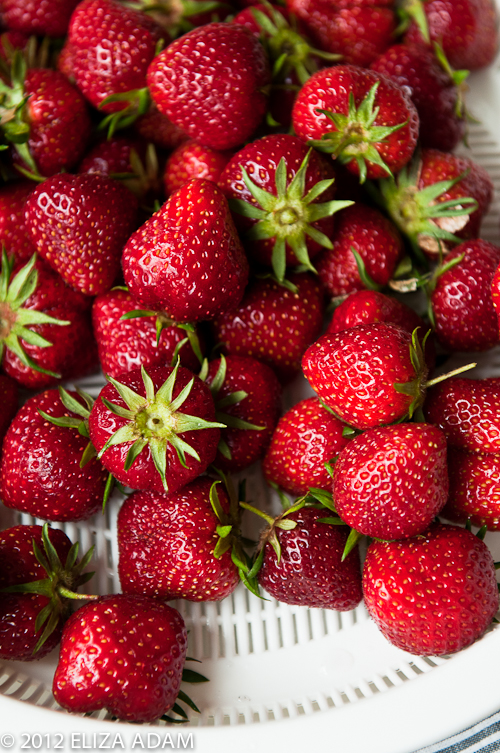
From my parents' garden, we harvested small but big in taste strawberries.  The plants are still producing quite a big yield every summer, enough for a week's consumption.  Every day my mom would be in the backyard harvesting the berries.  I have a box of strawberry plants as well in my backyard but due to lack of sun, they never really produce enough berries for us.  I'm thinking of replacing those with something else in the future.  But my herbs thrive in the box garden well enough that I'm happy to have fresh herb every spring to use in my kitchen.

Yesterday I decided to pick strawberries at Lee Farms in Tualatin.  My plan was to make strawberry jam and to freeze the rest that we can't eat anymore.  Last year I made some jams that I ended up giving to friends and family that I didn't have enough for myself.  This year I want all for myself and those who want it, should pay for it :D  I drove to the field with my son late afternoon though the sun was hot but  it's still bearable.  Being in the field made me happy, it gave me the feeling that warmth of summer is here to stay.  The strawberries were huge and they're red on the inside too; this is how ripe strawberries should look like.

strawberry banana crepe cake-1-3


strawberry banana crepe cake-1-2


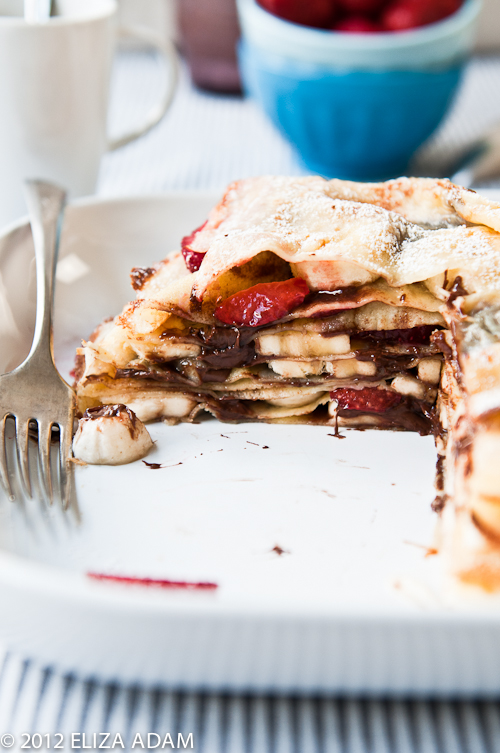
My son begged me to make strawberry pie and I also planned to make a breakfast treat for Father's Day, so even though we picked more strawberries than what we needed, they're off to good use.  Last night I made the crepe batter, stored it in the fridge afterwards, and this morning I cooked the crepe.  The crepe cake is consisted of layers of crepe with dollops of Nutella, sliced strawberries, and sliced bananas.  When I cut the cake to serve, the Nutella was oozing between the layers and they're so delicious.  Everyone agreed that this was a yummy breakfast and we all polished the whole cake in no time.  I'm dreaming of making a different combo next time...


Strawberry-Banana Crepe Cake


Serves 4


Crepe Batter:

3/4 cup all-purpose flour

1/2 cup granulated sugar

1/4 teaspoon salt

2 large egg and 1 egg yolk

1 1/4 cups whole milk

1 teaspoon vanilla extract

4 tablespoons (1/2 stick) melted butter, for the pan


Filling:

Chocolate-hazelnut spread, such as Nutella

Strawberries, sliced

Bananas, sliced


Confectioners' sugar


For crepes:  In a food processor, pulse flour, sugar, and salt until combined.  Add eggs and yolk; process until blended.  With the motor running, slowly pour in milk and vanilla; process until smooth.  Refrigerate batter for 15 minutes, or up to overnight.

Warm a 9-inch nonstick skillet over medium heat.  Add just a bit of butter to coat the pan.  Pour about 3 tablespoons of batter into hot pan; pick up pan and swirl it around to evenly spread batter.  Place back on heat; cook for 30 seconds (I like to cook until edges are starting to get brown).  Using a spatula and fingers, flip crepe; cook for 30 seconds.  Crepe should be almost firm to the touch and spotty brown.  Transfer to a cutting board.  Repeat process with remaining batter to make about 10 crepes.  (You may have extra crepes; add them to the stack.)

Preheat broiler.  Line a baking sheet with parchment paper.  Layer two crepes on prepared pan.  Spread a thin layer of Nutella onto the top crepe; add a few strawberry and banana slices.  Top with another crepe and layer more Nutella, strawberry, and banana.  Repeat this process with remaining crepes.  Top with a final crepe.  Place baking sheet under broiler until cake is warmed through.  Sprinkle cake with confectioners' sugar.


Source:  Debbie Macomber's Christmas Cookbook

Monday, June 4, 2012

Piña Colada Cake

There are days that I will definitely bake a cake, and those are birthdays and wedding anniversary.  Last week we celebrated our anniversary and my hubby's birthday's on dates that were only a day apart.  When I asked what kind of cake he wanted for his birthday, he asked for a cake with pineapple.  Pineapple in a cake sounded yummy and refreshing, and it's also in season and abundant right now.  So I went on searching on what kind of pineapple cake would be good to make, and I found it in the book by Alisa Huntsman and Peter Wynne, Sky High.  I've made cakes from the book before and I've had great result so I knew that I could rely on the recipes.

She has a piña colada cake which I thought was perfect.  Lime accented pineapple-like jam was used for the filling; the cake layers were of brown sugar that added butterscotch-like flavor, and the frosting was a smooth, airy, and not overly sweet meringue coconut buttercream.  I haven't made layered cake for a long time but surprisingly the step-by-step instructions in the recipe wasn't as complicated as I thought.  I know that I've always enjoyed the process of making a layered cake though I'm not really good at decorating it.  For cake decoration, I prefer something simple and unfussy, partly because I don't practice much and most importantly, I'd rather have the flavor to be the number one goal.

pina colada cake-1-6


pina colada cake-1-3


All in all we enjoyed the cake very much; piña colada in a cake, who could resist?


Piña Colada Cake


Makes a 9-inch triple-layer cake


1 can (20 ounces) crushed pineapple in juice (no sugar added)

1 cup sugar

1/4 cup freshly squeezed lime juice

1 one-inch piece of vanilla bean, split in half

Brown Sugar Cake, recipe follows

Coconut Buttercream, recipe follows

2/3 cup light rum (light, amber, or dark, whichever you prefer)

Coconut flakes and thin slice of fresh pineapple, for decoration


Combine the crushed pineapple, sugar, and lime juice in a large nonreactive skillet.  With the tip of a small knife, scrape the vanilla seeds into the pan; add the pod as well.  Warm over medium-low heat, stirring to dissolve the sugar, 2 to 3 minutes.

Raise the heat to medium and simmer, stirring occasionally to prevent scorching, until the juices have almost completely evaporated and the pineapple has a jamlike consistency.  Remove from the heat and discard the vanilla pod.  Let the pineapple filling cool completely before using.  (The filling can be made a day ahead and refrigerated.  Let return to room temperature before using.)

Bake the Brown Sugar Cake as directed.  Let the layers cool completely.  Prepare the Coconut Buttercream just before you're ready to use it.

To assemble the cake, place one layer, flat side up, on a cake stand or serving plate.  Sprinkle a generous 3 tablespoons rum over the cake. Spread half of the pineapple filling over the layer, leaving a 1/4-inch margin around the edge.  Add the second layer, sprinkle with more um, and cover with the remaining filling.  Top with the third layer, flat side up, and sprinkle with the remaining rum.  Frost the top and sides of the cake with the Coconut Buttercream.  Decorate with some coconut shreds and thin slices of pineapple.

pina colada cake-1-2

Brown Sugar Cake


Makes three 9-inch layers


3 3/4 cups cake flour

1 3/4 teaspoons baking soda

1 teaspoon baking powder

1/2 teaspoon salt

2 1/4 cups packed light brown sugar

2 sticks (8 ounces) unsalted butter, at room temperature

1 3/4 buttermilk

5 eggs

2 teaspoons vanilla extract


Preheat the oven to 350 degrees F.  Butter three 9-inch cake pans.  Line the bottom of each pan with a round of parchment or waxed paper and butter the paper.

Sift together the flour, baking soda, baking powder, and salt into a large mixer bowl; whisk gently to combine.  Add the brown sugar, butter, and 1 1/2 cups of the buttermilk to the dry ingredients.  With the mixer on low, blend to incorporate.  Raise the speed to medium and beat until light and fluffy, 2 to 3 minutes.

Whisk the eggs with the remaining 1/4 cup buttermilk and the vanilla and add to the batter in 3 additions, scraping down the sides of the bowl well and beating only long enough to incorporate between additions.  Divide the batter among the 3 prepared pans.

Bake for 25 to 28 minutes, or until a cake tester or wooden toothpick inserted in the center comes out clean.  Let the layers cool in the pans for 10 minutes; then turn out onto wire racks, carefully peel off the paper liner, and allow to cool completely before filling and frosting.


Coconut Buttercream


Makes about 5 cups


3 egg whites

1 cup sugar

1/4 cup water

2 1/2 sticks (10 ounces) unsalted butter, at room temperature

2/3 cup unsweetened coconut milk

1 1/2 teaspoons coconut extract


Put the egg white in the bowl of an electric mixer fitted with the whip attachment so they are all ready to go.

Combine the sugar and water in a small heavy saucepan and place over medium heat, stirring to dissolve the sugar.  Bring to boil and cook, without stirring, until they syrup reaches the soft-ball stage, 238 degrees F on a candy thermometer.

Beat the egg whites briefly at medium speed.  Slowly add the hot syrup in a thin stream, being careful to avoid the beaters.  Continue to whip until the meringue has cooled to body temperature.

With the mixer on low speed, gradually add the butter, several tablespoons at a time, and continue to beat until a smooth, fluffy frosting forms.

Add the coconut milk in several additions, scraping down the sides of the bowl well after each addition.  Add the coconut extract and mix until smooth.


Source:  Sky High by Alisa Huntsman and Peter Wynne

Saturday, May 26, 2012

Peanut Butter Oatmeal Cookies


As I'm looking outside my window, I see that the sun has finally come out on this late afternoon.  It does lift my mood seriously since this morning started with gloom and grey; sigh, that's the beauty of living in Oregon.  In a few days there'll be a lot going on in my schedule, I'm picturing a cake (with candles!), a project that's due (not mine, but still I'm a helper), a dinner (perhaps), and a homecoming (not of the young but the young at heart).  I'm thinking of tackling the cake tomorrow and I hope it'll be finished before the start of next week.  I've not baking a layered-cake for a long time, I don't know if I still have the mojo.  Fingers crossed!

For now, I want to share this oatmeal cookie recipe that I've made several attempts before.  This is one of the best oatmeal cookie recipe that I've tried and several people have tried it and commented on how delicious this was.  The texture is the perfect, chewy and crispy--especially when just comes out of the oven--and the recipe works with any add-ins you want.  I've tried it with M&M chips for kids, butterscotch chocolate chips, as well as Heath chocolate pieces.  My personal favorite is butterscotch chocolate chips with slivered almonds.  The size of the cookies is pretty flexible as well, you can make it jumbo or regular size.  The jumbo-sized cookie is a little fragile, so it's best to wait until it cools down on baking sheet considerably before moving it to a cooling rack.  Usually I can't wait until it cools down and I'll start nibbling at it.

Peanut Butter Oatmeal Cookies


Peanut Butter Oatmeal Cookies


When I ate this the weather was still cold, hence the warm cocoa in the photo :)  But of course with any good cookie, this can be enjoyed anytime of the year!

Peanut Butter Oatmeal Cookies


Yields about 26 large or 60 small cookies


1 cup peanut butter

1/2 cup unsalted butter, softened

1 1/2 cups packed brown sugar

1/2 cup granulated sugar

1 1/2 teaspoon baking powder

1/2 teaspoon baking soda

3 eggs

2 teaspoons vanilla extract

4 cups regular rolled oats

3/4 cups chopped peanuts, walnuts, pecans, or almonds

1 1/2 cups M&M chocolate chips, semisweet chocolate chips, bittersweet chocolate chips, butterscotch chocolate chips, or Heath chips


Preheat oven to 350°.  Beat the peanut butter and butter with an electric mixer on medium to high speed for 30 seconds.  Add the sugar, baking powder, and baking soda; beat until combined.  Beat in the eggs and vanilla until combined.  Stir in the rolled oats, the nuts, and chocolate pieces.

Use a 1/4-cup measure or scoop to drop dough 4 inches apart onto an ungreased cookie sheet.

Bake in preheated oven about 15 minutes or until edges are lightly browned.  (For smaller cookies, use a teaspoon to drop dough about 2 inches apart on an ungreased cookie sheet.  Bake in preheated oven about 10 minutes or until edges are lightly browned.)  Cool on the cookie sheet for 2 minutes.  Transfer cookies to wire racks; cool.

To store:  Place in layers separated by waxed paper in an airtight container; cover.  Store at room temperature for up to 3 days or freeze for up to 3 months.


Source:  adapted from 100 Best Cookies by Better Homes and Gardens, 2006.

Friday, May 4, 2012

Black-Eyed Peas and Corn Salad


I can't believe I sailed through two months without any writing here!  Honestly, I had all the intentions but time ran faster than I could catch. I have been back in the kitchen cooking since the end of March, but I haven't cared too much for baking surprisingly.  My work assignment was endless; it seemed like forever to finish it up.  By the time that ended, I had an out-of-town guests coming to visit the Portland area.  They're staying in Portland, but almost every weekend I've spent time with them going around town.  We have a lot of fun eating out and sightseeing, but it did take a lot of my free time.  From work to play, it's a full two-month schedule.

So here is May.  Maybe it's time to write again.

Food trends come and go so fast, riding them will feel like a roller coaster.  One day bacon is in, the next day bacon is out.  I don't feel the need to follow all the food trends/news in my blog because I know I won't be able to write religiously about all the stuff, therefore I only read them for leisure (and for keeping up with the work).  What I'm about to share with you maybe has been gone out of fashion (or foodshion?), but I enjoy eating it so I still want to do it.  A lot of you may have found the recipe somewhere else, but again this blog is my food diary.  It's the black-eyed peas and corn salad, or Texas caviar, or cowboy caviar; whatever name you may call it, it's so good and simple.  I don't know how to describe it other than to have it frequently and serve with lots of tortilla chips, and drink of your choice.  Maybe you'll serve it for Cinco de Mayo?

texas caviar-1-2


Black-Eyed Peas and Corn Salad


Serves 8


1 clove garlic, minced

3 tablespoons extra-virgin olive oil

1 1/2 tablespoons red wine vinegar

1 teaspoon salt

1/4 teaspoon black pepper

1 teaspoon cumin

2 11-oz. can white shoepeg corn, drained

1 15-oz. can black-eyed peas, drained and rinsed

1/2 green bell pepper, diced

1/2 small red onion, diced

2 medium tomatoes, seeds removed, diced

A handful of fresh cilantro, chopped

1 medium ripe avocado, diced


In  a large bowl, whisk together garlic, olive oil, vinegar, salt, pepper, and cumin.  Add corn, black-eyed peas, bell pepper, red onion, and tomatoes.  Toss salad until the ingredients are coated with the dressing.  This can be done ahead of time and store salad in the refrigerator.  Add cilantro and avocado just before serving.  Adjust seasoning as well.

Note:  if you like a little heat in the salad, feel free to add 1-2 seeded, diced, jalapenos.

Sunday, March 4, 2012

Orange Chocolate Bundt Cake


The day started somewhat cloudy.  As I opened my bedroom windows, I doubted the sun would come out; but it did a little later.  While I was busy working, the kitchen windows were opened slightly, letting the fresh air in.  I suddenly thought of how close spring will be, it seemed like it's already in the air.  The day turned out to be a gorgeous day, it slightly annoyed me that I had to stuck in the kitchen, baking and doing my assignment.  My consolation was that the things I made was quite summery and undoubtedly peachy.

But this post is about a bundt cake I made a few months ago.  This cake is phenomenal in its simplicity.  With just yogurt and olive oil, you can make a moist and light bundt cake, it's the best ever recipe I've done so far.  I owe thanks to the book, Baked Explorations by Matt Lewis and Renato Poliafito; these guys know how to bake real well.

The only modification I made was to add chopped bittersweet chocolate in the batter.  With or without the chocolate, the cake is still wonderful.

Orange-Chocolate Yogurt Olive Oil Bundt Cake-1-4

Orange Chocolate Bundt Cake


Makes one 10-inch bundt cake


3 cups all-purpose flour

1 tablespoon baking powder

1/2 teaspoon salt

4 large eggs, separated

2 cups granulated sugar

1 cup plain yogurt--I use low-fat, organic local yogurt

3/4 cup good-quality extra-virgin olive oil

Freshly grated zest of 2 oranges

1 1/2 teaspoons pure vanilla extract

1/2 cup chopped bittersweet chocolate

1/2 cup confectioners' sugar, sifted, for dusting


Preheat oven to 325°F.  Spray the inside of a 10-inch Bundt pan with nonstick cooking spray.  You can also butter the pan well, dust with flour, and knock the excess flour out.

In a large bowl, whisk together the flour, baking powder, and salt.  Set aside

In a large bowl of a standing mixer fitted with the paddle attachment, beat the egg yolks until they are pale and light; slowly pour in the sugar until it is completely incorporated.  Add the yogurt and olive oil and mix it until thoroughly combined.  Add the orange zest and vanilla, and mix until just incorporated.

Add the flour mixture to the wet ingredients in two parts, beating after each addition until just combined (this will take about 10 seconds).  Scrape down the bowl and beat again for 5 seconds.  Add the chopped chocolate, fold with a rubber spatula.

In another large bowl, beat the egg whites until stiff peak forms.  Scoop 1 cup of the egg whites into the batter.  Use a rubber spatula to gently fold them in.  After about 30 seconds of folding, add the remaining egg whites and gently fold until they are almost completely combined.  Do not rush the folding process.

Pour the batter into the prepared pan and bake for 40 to 50 minutes, rotating the pan halfway through the baking time, or until a small sharp knife inserted into the cake comes out clean.  Transfer the pan to a wire rack to cool completely.  Gently loosen the sides of the cake from the pan and turn it out onto the rack.

Just before serving, dust the cake with the confectioners' sugar.

The cake can be stored at room temperature, covered tightly, for up to 3 days.


Source:  adapted from Baked Explorations by Matt Lewis and Renato Poliafito